

Building an end grain cutting board is an ambitious and rewarding project that transforms raw wood into a functional and aesthetically pleasing kitchen tool. Unlike traditional cutting boards, end grain boards showcase the natural beauty of wood, highlighting its fibers in a distinctive pattern that resists wear and tear. Whether you’re an experienced woodworker or a novice, this guide will walk you through every step of crafting you build own end grain cutting board, from selecting the right materials to finishing it for durability.
Essential Tools and Materials You’ll Need
Before embarking on this woodworking journey, it’s crucial to have the right tools and materials at your disposal. The foundation of any successful end grain cutting board project lies in having quality wood and reliable equipment.
The primary material you’ll need is hardwood—maple, walnut, cherry, or oak are ideal choices for their durability and aesthetic appeal. These woods possess the strength to endure knife impacts and develop a rich patina over time. Additionally, you’ll require wood glue, clamps, and wood finish for sealing.
Tools essential for this project include:
- A saw for cutting wood into the desired dimensions
- A planner to ensure smooth surfaces
- Sandpaper or a sanding machine for finishing touches
- A jointer or table saw for precise cuts
- A router for shaping the edges
Having these tools at hand will streamline the process and yield a professional-quality cutting board.
Here Are Some Steps For How To Build End Grain Cutting Board
Step 1: Preparing the Wood for Your End Grain Cutting Board
The first step in creating a beautiful end grain cutting board is preparing the wood. Start by selecting straight, flat pieces of hardwood. Measure and cut the wood into strips that are slightly longer than the final dimensions of the cutting board.
Next, use a planer to smooth out any imperfections and ensure the strips are even in thickness. Any cupping or twisting must corrected before continuing, as these issues can affect the alignment and stability of the final board. Once all the wood pieces are smooth, cut them into uniform lengths that will form the board’s foundation.
Step 2: Arranging the Wood for an Attractive End Grain Pattern
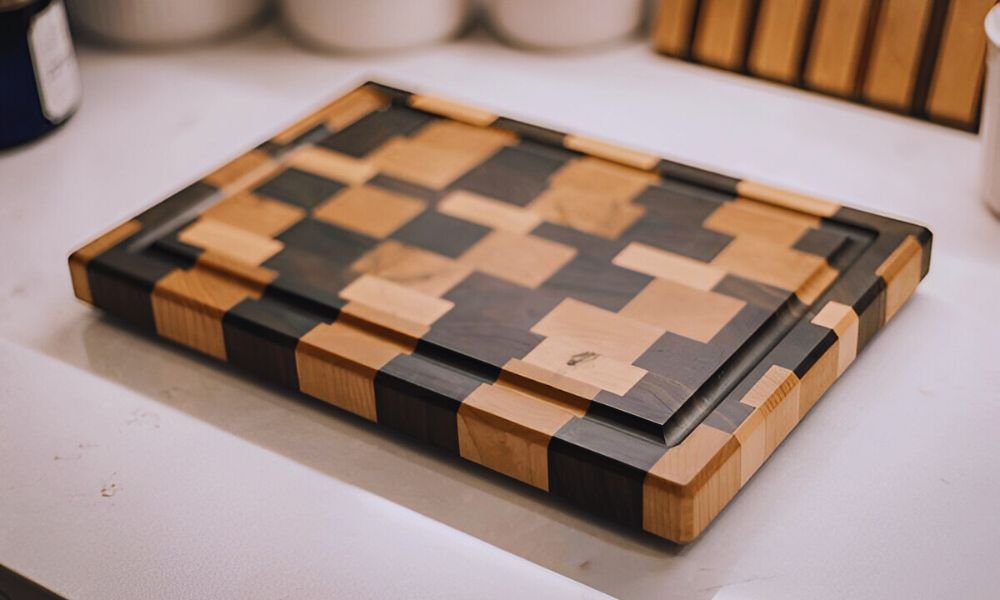
The charm of an end grain cutting board lies in its intricate wood grain pattern. This is achieved by arranging the wood strips so the ends face upward, showcasing the natural fibers. To create a striking pattern, experiment with varying colors and types of wood. Alternate light and dark woods for a contrasting effect, or consider creating a checkerboard pattern for visual interest.
Align the strips in the desired arrangement on your work surface, ensuring that they are tightly fitted together without gaps. It’s essential that the grain runs perpendicular to the board’s surface, as this orientation ensures maximum durability and resistance to knife damage.
Step 3: Gluing the Wood Pieces Together
With the wood arranged in an attractive pattern, it’s time to glue the pieces together. Apply wood glue to the edges of each strip, ensuring an even coat. Be generous but not excessive, as too much glue can lead to mess and excess that will need to be sanded off later.
Once the glue is applied, carefully press the strips together. Use clamps to hold the pieces in place and create a strong bond. Clamp them for several hours, or according to the manufacturer’s instructions for your glue. The goal is to ensure the wood pieces are securely adhered without any gaps between them.
Step 4: Planning and Sanding the Surface Smooth
After the glue has dried, it’s time to smooth the surface of the cutting board. Start by using a planer to remove any excess glue and to ensure all strips are flush. If you don’t have a planer, a belt sander or hand sanding will work as an alternative, though it may take longer to achieve the same smoothness.
Once the surface is level, begin sanding with progressively finer grits of sandpaper, starting from a coarse 80-grit and working your way up to a fine 220-grit paper. Sanding not only removes imperfections but also prepares the wood for finishing. Pay attention to the edges as well, as these will handled during the next steps.
Step 5: Creating the Perfect Edge for Your Cutting Board
The edges of your cutting board should be aesthetically pleasing and functional. To achieve smooth, rounded edges, use a router with a round-over bit, or if you prefer a more angular look, employ a table saw for precise cuts. This is where you can add your personal touch, giving the cutting board a more refined or rustic appearance, depending on your preference.
Once the edges are shaped, sand them lightly to remove any sharp corners or rough spots. The rounded edges not only improve the board’s appearance but also make it safer to handle, preventing any splinters or cuts during use.
Step 6: Sealing and Protecting the Cutting Board
To ensure your cutting board stands the test of time, proper sealing is essential. Apply a food-safe finish, such as mineral oil or a blend of beeswax and coconut oil. This will penetrate the wood, providing a protective layer that helps resist moisture, stains, and odors.
Use a clean cloth or paper towel to apply the finish evenly, working it into the wood’s grain. Allow the board to absorb the oil for a few hours, then wipe off any excess. Reapply the finish several times over the course of a few days to ensure the wood is fully sealed.
Bonus Tips for a Long-Lasting End Grain Cutting Board
To prolong the life of your end grain cutting board, regular maintenance is key. Apply a fresh coat of oil every few weeks, depending on usage, to keep the board hydrated and looking its best. Avoid soaking the board in water, as prolonged exposure can cause the wood to warp. When cleaning, use mild soap and warm water, and always dry the board immediately to prevent moisture absorption.
Additionally, store your cutting board in a dry place, away from direct sunlight, to maintain its shape and prevent cracking.
Why End Grain Cutting Boards Are Perfect for Beginners
Though crafting an end grain cutting board may seem complex, it is an excellent project for beginners. The process allows you to familiarize yourself with essential woodworking techniques, such as cutting, sanding, gluing, and finishing, without requiring advanced skills or equipment. Plus, the finished product is not only functional but also a beautiful piece of craftsmanship that you can be proud of.
Your Beautiful End Grain Cutting Board Awaits
Creating your own end grain cutting board is a gratifying woodworking project that results in a durable, functional, and visually stunning kitchen accessory. With the right tools, patience, and attention to detail, you can craft a board that will serve you for years to come, all while honing your woodworking skills. So gather your materials, roll up your sleeves, and embark on the journey of build your very own end grain cutting board.